Showing posts with label 程式開發. Show all posts

2012/07/04

[WPF] Asynchronously Loading Image From Internet using C# 5.0 (.NET Framework 4.5)


Requirement

I want to create a WPF window which displays many images from internet. I put many <Image> element on the window and set the Source of every <Image>. When I run the application, the UI is locked till all images loaded completely. This, UI locked, is not what I want. Is there any way to load image asynchronously?

Old Implement by ThreadPool

Then, an idea come to my head: make a user control and load image in another thread. My first implement use ThreadPool, Dispather to achieve this goal. But that is not the point of this article.

C# 5.0 and .NET Framework 4.5 do more for you

Recently I read that C# 5.0 introduced new keyword async and await. It make asynchronous programming simple. So I want to take a try. And I just want to share with you what I found.

The markup of <AsyncImage>

I create a user control named AsyncImage and put an Image element named “img” inside. The xaml is very simple.

<UserControl ...>
  <Grid>
    <Image name="img" />
  </Grid>
</UserControl>

As it is a control that can be put on the UI. I want to set the image source string when using it. Therefor I add a dependency property into the code.

public string ImageSource {
    get { return (string)GetValue(ImageSourceProperty); }
    set { SetValue(ImageSourceProperty, value); }
}

public static readonly DependencyProperty ImageSourceProperty =
    DependencyProperty.Register("ImageSource", typeof(string), typeof(AsyncImage), new UIPropertyMetadata("", OnImageSourceChanged));

When ImageSouce is set, it will call OnImageSourceChanged. It looks like this.

private static void OnImageSourceChanged(DependencyObject d, DependencyPropertyChangedEventArgs e) {
    AsyncImage v = d as AsyncImage;
    if (v == null)
        return;

    v.ShowImageAsync(e.NewValue.ToString());
}

The key word async And await

Let’s see the rest codes.

protected async void ShowImageAsync(string source) {
    img.Source = await LoadImageSourceAsync(source);
}

private async Task<ImageSource> LoadImageSourceAsync(string address) {
    ImageSource imgSource = null;

    try {
        MemoryStream ms = new MemoryStream(await new WebClient().DownloadDataTaskAsync(new Uri(address)));
        ImageSourceConverter imageSourceConverter = new ImageSourceConverter();
        imgSource = (ImageSource)imageSourceConverter.ConvertFrom(ms);

    } catch (Exception ex) {
        Debug.WriteLine(ex.Message);
        Debug.WriteLine(ex.StackTrace);
    }

    return imgSource;
}

ShowImageAsync is a void method modified by async keyword. Because there is a await call in the method block. 

LoadImageSource is another asynchronous method. It downloads the image by await call to WebClent.DownloadDataTaskAsync. WebClient class in .Net Framework 4.5 adds several asynchronous method which adding the word, “Async”, behind the original method name. The new method of the WebClient is the key point. It can do works in the background and return value when works completed. When I set img.Source by await call to LoadImageSourceAsync, it will do its works in the background, too.

I put AsyncImage in a test window. When downloading image, the window can still drag, move, change size. Only one thing. UI will still be locked in a very short time when Image.ImageSource is setting.

Responsive UI is easy

With async and await, asynchronous method call is like normal method. It reduced the cross thread call exceptions. A high performance and responsive UI is more and more easy.

2010/06/11

Use WCF to upload image data within a class

Here is a workable sample of uploading image data by WCF.

Requirement:

I have a data model includes image. I want to upload it from client to server.

History:

It was a case in tabular model days. I serialize dataset to a xml file and zip the image file together.  Then upload the zip file to a FTP server. And server side programs will get the zip file in the ftp folder.

Issues:

When uploading files via FTP, I did not know the transfer result. Some times the zip file was broken, but I won't know until server sent an error report to me. Maybe add a md5 check will be good. But even md5 check solve the issue of the broken file. It still need me to do something manually to make the client upload files again. I want the client know uploading result in the meantime. And client can upload again if there is a problem.

Possible Solution:

First, I considered Web Services. But in the final I turned into WCF. Because it can host a service on any processes without a web server. I am not sure WCF is the best way for me. But it dose help me.

Studies:

I list these articles which help me to achieve the goal.

WCF Streaming: Upload files over HTTP by Kjell-Sverre Jerijærvi (February 07, 2007).
How to: Enable Streaming, MSDN.
XML Serialization in C# - Part II – Images by Prajna Das (March 29, 2007).
"There is an error in XML document (0, 0)." error while XML Deserialization, MSDN Data Developer Center Forum.

My first question is how to upload files with WCF. People will suggest you using “Streamed” transfer mode. But many samples I googled, the service only provide a method to receive Stream. What if I want to pass a class instance? Finally I figured out that serialize my class into stream and transfer to server.

The second question is how to serialize images. The article “XML Serialization in C#” listed above give me a thought that Bitmap is hard to handle. I am lazy and not smart, so I want the code is as simple as possible. Then I remembered a project which I participated around 2005. One program in that project has a function: save image to xml file. Lucky I could find that project beside my hand.

Everything is ready. Let’s look how to implement my solution.

Implement I: XML Serialization

In the first, I want to transfer a image data within a class. The data model is:

public class ImageData {
    public string Id { get; set; }
    [XmlElementAttribute(DataType = "base64Binary")]
    public byte[] ImageContent { get; set; }
}

You may notice that the ImageContent property is byte[]. And I added a attribute above it to tell Serializer how to serialize it. Here is a SerializeHelper class handles serialize and deserialize.

public class SerializeHelper {
    public static void Serialize<T>(out Stream stream, T item){
        stream = new MemoryStream();
        XmlSerializer x = new XmlSerializer(typeof(T));
        x.Serialize(stream, item);
        stream.Position = 0;   
    }

    public static T Deserialize<T>(Stream stream) {
        XmlSerializer x = new XmlSerializer(typeof(T));
        T obj = (T)x.Deserialize(stream);
        return obj;
    }
}

The last line of the method, Serialize, is very important. If you did not set the position to 0, you will encounter a exception when deserialize: “There is an error in XML document (0, 0)”. For more information, you can read the article I listed above to learn what happened.

Implement II: WCF service

The service is very simple.

[ServiceContract]
public interface IImageServer {
    [OperationContract]
    Stream GetStream(string data);

    [OperationContract]
    bool UploadStream(Stream stream);
}

Just as the same as MSDN sample. How do I implement it ? See this:

[ServiceBehavior(InstanceContextMode = InstanceContextMode.Single)]
public class PictureServer : IPictureServer {
    public System.IO.Stream GetStream(string data) {
        try {
            ImageData item = new ImageData();
            item.Id = "001";
            item.ImageContent = File.ReadAllBytes(@"c:\temp\001.tif");

            Stream stream = null;
            SerializeHelper.Serialize<ImageData>(out stream, item);
            return stream;

        } catch (Exception ex) {
            Console.Write(ex.Message);
            return null;
        }
    }
   public bool UploadStream(Stream stream) {
        if (stream == null)
        return false;
    
        try {
            ImageData item = SerializeHelper.Deserialize<ImageData>(stream);
            File.WriteAllBytes(@"c:\temp\001_server.tif", item.ImageContent);
        } catch (Exception) {
            return false;
        }
        return true;
    }
}

I hardcode the behaviors in GetStream and UploadStream just for testing the mechanism. And then the app.config of the service.

<?xml version="1.0" encoding="utf-8" ?>
<configuration> 
  <system.serviceModel> 
    <services> 
      <service name="StreamService.PictureServer" 
               behaviorConfiguration="PicutreServerBehavior"> 
        <host> 
          <baseAddresses> 
            <add baseAddress="http://localhost:8000/PictureServer"/> 
          </baseAddresses> 
        </host> 
        <endpoint address="" 
                  binding="basicHttpBinding" 
                  bindingConfiguration="StreamedHttp" 
                  contract="SteramService.IPictureServer"/> 
        <endpoint address="mex" 
                  binding="mexHttpBinding" 
                  contract="IMetadataExchange"/> 
      </service> 
    </services> 
    <bindings> 
      <basicHttpBinding> 
        <binding name="StreamedHttp" 
                 transferMode="Streamed" 
                 maxReceivedMessageSize="67108864"/> 
        </basicHttpBinding> 
    </bindings> 
    <behaviors> 
      <serviceBehaviors> 
        <behavior name="PicutreServerBehavior"> 
          <serviceMetadata httpGetEnabled="True"/> 
        </behavior> 
      </serviceBehaviors> 
    </behaviors> 
  </system.serviceModel>
</configuration>

The most important is the binding element. You need set transferMode to “Streamed” and set maxReceivedMessageSize appropriately. In my case, it is 64mb.

Implement III: Client

Now we can implement a client application to communicate the service. Upload and Get stream. I hardcode some behaviors, too.

class ClientApp {
    IPictureServer server;

    internal void Run() {
        ConnectServiceViaChannelFactory();
        GetImageData();
        UploadImageData();
    }

    private void UploadImageData() { 
        ImageData item = new ImageData();
        item.Id = "001";
        item.ImageContent = File.ReadAllBytes(@"c:\temp\001.tif");


        Stream stream = null
        SerializeHelper.Serialize<ImageData>(out stream, item);
        
        bool success = server.UploadStream(stream);
        if (success) {
            Console.WriteLine("Upload stream successfully.");
        } else {
            Console.WriteLine("Failed uploading stream.");
        }
        Console.WriteLine("Press <enter> to terminate.");
        Console.ReadLine();
    }
    private void GetImageData() {
        Stream stream = server.GetStream("");
        if (stream == null)
            return;

        ImageData item = SerializeHelper.Deserialize<ImageData>(stream);
        File.WriteAllBytes(@"c:\temp\001_client.tif", item.ImageContent);
    }
    private void ConnectServiceViaChannelFactory() {
        server = CreateServiceProxy<IPictureServer>(
            CreateStreamingBinding(),
            "http://localhost:8000/PictureServer");
    }
    private T CreateServiceProxy<T>(Binding binding, string address) {
        ChannelFactory<T> factory =
            new ChannelFactory<T>(
                binding,
                new EndpointAddress(address)
            );
        return factory.CreateChannel();
    }
    private Binding CreateStreamingBinding() {
        //max MessageSize: 64MB
        BasicHttpBinding binding = new BasicHttpBinding {
            TransferMode = TransferMode.Streamed,
            MaxReceivedMessageSize = 67108864
        };
        return binding;
    }
}

Beware that in CreateStreamingBinding method, we need set MaxReceivedMessageSize, too. After uploaded stream, we can get a result. In real case, if the result is false, we need take some actions. For example, save the item to a queue, and retry while a moment. Because the type of ImageData.ImageContent is byte array, it can be any type of file in the fact.Here is keywords for search engine.
WCF, upload image file, XML, Serialize, Bitmap, Complex type, stream, large data

2009/07/21

MSDN 雜誌線上文章中英對照功能

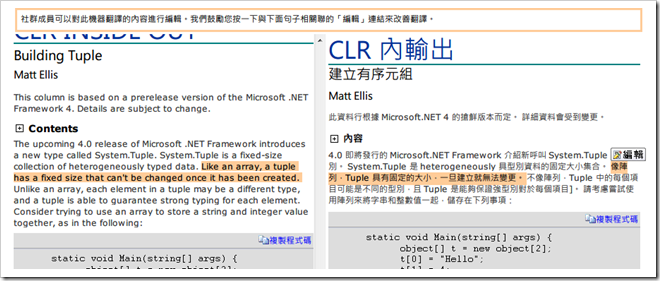
許久沒有看 MSDN 雜誌的線上文章了,赫然發現現在不但有中英對照本版,還可以逐句對映,並且可以編輯中譯內容。由於中文內容一向是繼器翻譯,所以文句上面總是不通順,微軟這招讓社群成員可以編輯中譯本的功能,也頗不錯,集合大家的力量讓中文化資源越來越豐富。雖然是機器翻譯,有些時候還是可以省去翻字典的時間。

msdn_mag

2009/07/10

Microsoft Expression Blend 2 SP1 安裝問題

在微軟 Expression 網站下載英文版的 Blend 2 試用版安裝完成後,接著下載 Blend 2 SP1,安裝完成後,執行 Blend 2 卻跳出一個警示訊息 "The prereleased version of this product has expired. You must update to a newer release.",關掉訊息後,程式也隨之結束。在 google 上爬文後於這個討論串看到有人(Cary321)發現解決方式。

在下載 Blend 2 SP1 的網頁,按下 download 後,會跳到一頁 “Thank You for Downloading” 的說明頁面。在這個說明頁面有另外一個連結,那種告訴你如果瀏覽器沒有自動下載檔案,可以點這裡下載的說明 : "If your download does not start after 30 seconds, click this link: Start download. " 請點一下 "Start download”,下載這個 Blend 2 SP1 安裝檔。

自動下載的檔案和手動下載的檔案名稱雖然一樣,但是檔案大小不同,請安裝手動下載的那個。現在,你可以安心的使用 Blend 2 了。

2009/07/07

在微軟報表檢視器加入自訂程式碼 實例說明

加入程式碼的 MSDN 說明請參考: Adding Custom Code to a ReportViewer Report

在製作報表的時候,客戶有一個需求,假設資料的內容如下:

班號
(ClassNumber)
學生姓名
(StudentName)
001 王大明
001 陳小華
002 李大丙
002 吳小菁
003 張小英

希望輸出的報表的時候,重複的班號不要顯示,如下:

班號 學生姓名
001 王大明
  陳小華
002 李大丙
  吳小菁
003 張小英

在一般製作報表的時候,班號的這個欄位會填上 Fileds!ClassNumber.Value 的內容,但要怎麼才可以濾掉重複出現的班號呢? 使用自訂程式碼。

展開 Visual Stuio 的命令選單 Rport –> Report Properties,選擇 Code 頁籤,寫一段判斷式的函式。如下:

Dim tempClassNumber as String = ""
Public Function ShowClassNumber(ByVal classNumber as String) as String
    If (classNumber = tempClassNumber)
        Return ""
    End If
    tempClassNumber = classNumber
    Return classNumber
End Function

然後在設計報表的地方使用如下的 expression:

=Code.ShowClassNumber(Fileds!ClassNumber.Value)

客戶期望的報表內容就成功了。

自訂程式碼是動態地將程式碼編譯到報表內建的 Code 類別,以記事本打開報表設計 rdlc 檔案,可以在 <code> 區塊看到上面寫的程式碼。在報表的 expression 編輯器,使用 Code 類別來呼叫。有幾點要注意一下:

1. 必須先編譯一次專案才可以使用自訂的程式碼。
2. 在 expression 編輯器不會自動列舉自訂程式碼裡面的函式名稱。
3. 自訂程式碼必須以 Visual Basic 撰寫。

2008/08/07

什麼是正確的握刀與拔刀方式?

這句話是依達我流問良峰貞義的,當劍聖收依達我流做徒弟後,第一件事情就是叫他去向良峰貞義學習正確的握刀與拔刀方式。什麼是正確的握刀與拔刀方式? 在多次的體悟後,依達我流終於答出正確的答案。

正確的握刀與拔刀,就是沒有多餘的動作,只為目標而握刀,只為目標而拔刀。當手握刀之前就已經決定,這一刀要往哪邊拔出,往哪邊揮斬,在拔刀之前一瞬間制敵機先。

以上故事是霹靂神州第17集的劇情。是啊~ 這是布袋戲裡面的劇情。不過在這段短短的劇情中,體會出幾件人生通則:專心、決心。除此之外呢? 目標!

常常在開發軟體或製作專案時,會發現功能不斷擴增,需求不斷改變,計畫永遠不足。為什麼會這樣? 因為我們缺乏明確目標,不只是身處開發者的我們,客戶與其他的第三者亦同。因為沒有明確的目標,所以對正在開發階段的項目,一邊討論需求一邊修改,產生多餘的工作打亂了原訂的計畫,使得我們無法專心致志。

螺旋開發法與 MSF 都強調階段性,在每個 iteration 中大致包含需求、設計、開發、測試的流程。在一個 iteration 中如果發現新的需求,可以排入下一個 iteration,以免打亂目前的開發節奏。堅守開發的節奏與流暢度,才能讓軟體品質節節高昇。

2008/02/01

學習筆記: 目標是設計軟體框架

我的新任務

從僅具有物件基礎概念,到練就一身能夠設計 framework 的能力,這中間的學習過程,我將記載於此一系列的筆記中。我所使用的技術是 .NET Framework 2.0,語言為 C#。

從 2002 年在巨匠電腦補習上 Java 課的時候,同時開始自修 C#。自此投入 .NET Framework 的技術領域。迄今已有五個年頭,對於程式設計熟稔度僅止於是個熟練的 programmer,直至遇見一位機緣結識的朋友,在他的接納下,加入他的團隊,開始真正踏入軟體設計之路,也打開了我的視野。

我發覺,使用 .NET Framework 的技術,可以很快速的開發各類解決方案,但是因為它的好用,使得我在大部分的情況下,並不會去深入探究更多的軟體設計核心。幾乎遇到的任何問題都可以在當下迎刃而解。或至少花苦工就能解決大多數的問題。總是見招拆招。這樣的結果,造成忽略許多軟體工程,也不能成就一個真正好用的軟體。

曾經,我看著幾個常用的軟體,如 foobar2000 播放器,或是類似的多媒體播放軟體,總為它的高度延伸性所折服,想不透為甚麼可以做出這麼好的 plug-in 架構,它是怎麼辦到的? 其實我早就學過了,透過介面設計,還有動態載入組件就可以達成,卻完全沒有運用過,甚至不知道如何運用,更遑論發揮其潛能了。

懵懂的我去上了一門課,軟體設計架構師精修班,在林耀珍老師的介紹中,看到許許多多的 design patterns。那時,design patterns 對我而言猶如天上群星,雖耀眼卻渺不可及。

現在我被賦予要開發一套 framework 的任務,是一件非常大的挑戰。然而人如果不把目標訂得夠大夠遠 (當然不要好高騖遠),並且施予適度的壓力,就不會想快馬加鞭奔馳而去。目前仍在起步階段的我,必須閱讀許多書本,並詢問前輩意見,才能慢慢做出一些有樣子的東西。

這過程中有許多的嘗試與心得,才發現,這種學習的心路歷程的經驗,沒有任何書本在傳遞的。而我一直認為,學習力是人類最重要的技能,在前輩鼓勵下,我開始將之一點一滴記錄,希望能夠在同輩與後進簡產生一些迴響,也希望各位前輩看到任何不足之處,予以指導與啟發。

書單

先列出目前閱讀的書籍,是這些書開始帶我進入軟體設計的領域。
1. 深入淺出設計模式 Head First Design Patterns (O'Reilly)
2. UML 與樣式徹底研究 by Craig Larman (Pearson)
3.物件導向分析設計與實作 by 葉智偉 (儒林)
4. Windows Forms 框架設計實務 by 黃忠成 (金革)
5. 應用框架的設計與實現-.NET平台 by Xin Chen (電子工業出版社)
6. UML Distilled 3rd Edition by Fowler (Pearson)
7. Framework Design Guidelines by Krzysztof Cwalina, Brad Abrams (Addison-Wesley)

2008/01/02

Visual Studio 2008 Express 免費下載

軟體開發人員眾所矚目的 Visual Studio 2008 RTM 公布了,連同 Express 版本也開放下載。喜歡搶鮮的朋友可以去 Express 開發者網站下載。更重要的是,下載後要去註冊,可以獲得許多 3rd party 的元件。包含:

  • Rad ribbonbar by Telerik — Provides an easy-to-design implementation of Microsoft Office 2007 ribbon user interface.
  • BubbleBar by DevComponents — A uniquely tabbed toolbar control with magnifying/bubbling buttons.
  • SpreadsheetGear for .NET by SpreadsheetGear — Develop Microsoft Excel compatible Windows Forms and ASP.NET Microsoft Reporting applications.

看到這些有沒有已經流口水了。

Windwos Form 開發 : MDI 設計模式 step by step

使用 .NET 開發 MDI 模式的視窗應用程式是非常容易達成的,透過視窗屬性設定 IsMdiContainer 為 true 就可以將子視窗的 MdiParent 屬性指向自己,這是最簡易的 MDI 設計方式。以下以Visual Studio 2005 示範如何建立一個 MDI 模式的視窗程式。

一、基本做法

首先在 Visual Studio 2005 開啟一個 Windows Application 專案,命名為 MdiDemo。
1. 將 Form1 變更檔案名稱為 MainForm,VS 會自動幫你將 class 名稱也一起變更。
2. 在 Design View 可以看到表單的外觀,然後將 MainForm 的 IsMdiContainer 屬性設定為 true。此時會看到表單內區域變成深灰色。
3. 從工具列拉一個 Panel 元件到表單上,並設定 Dock 屬性為 Top。
4. 接下來拉三個 Button 到 Panel 上,分別顯示為 Form1, Form2, Form3
完成以上步驟後,表單外觀如圖(一):

Figure1
圖(一) MainForm 外觀

接下來,在專案新增三個Form,分別為 ChildForm1, ChildForm2, ChildForm3,並在表單上放一個 Label 元件,如圖(二)。

Figure2
圖(二) ChildForm 外觀

如此,表單的外觀都完成了,開始在 MainForm 的按鈕事件撰寫呼叫子視窗的程式。

private void button1_Click(object sender, EventArgs e)
{
ChildForm1 frm = new ChildForm1();
frm.MdiParent = this;
frm.Show();
}

然後在另外兩個按鈕的 Click 事件中,分別呼叫 ChildForm2, ChildForm3。完成後將程式執行,並且按下 button1,結果如圖(三)。

Figure3
圖(三) 各個 ChildForm 都開在 MainForm 裡面

在 button1_Click 裡面加上一行程式碼。

private void button1_Click(object sender, EventArgs e)
{
ChildForm1 frm = new ChildForm1();
frm.MdiParent = this;
frm.WindowState = FormWindowState.Maximized; //設定視窗起始狀態為最大化
frm.Show();
}

當按下按鈕後 ChildForm 會自動放到最大,MainForm 會出現一列 MDI 視窗的控制按鈕,如圖(四)。簡單的 MDI 設計模式的便完成了。

Figure4
圖(四) ChildForm 放到最大的執行結果

二、進階處理

雖然完成了 MDI 模式,但是連續按下 button1 會發現 ChildForm1 可以被重複產生。為修正這個狀況,可以使用 Singleton 設計方式來產生 ChildForm。
首先,手動修改 ChildForm1 的程式碼。

public partial class ChildForm1 : Form
{
#region Singleton
private static ChildForm1 instance = null;

private ChildForm1() //建構子改為 private
{
InitializeComponent();
}

public static ChildForm1 GetInstance()
{
if (instance == null)
{
instance = new ChildForm1();
}

return instance;
}

//關閉視窗後,將instance設為null
private void ChildForm1_FormClosed(object sender, FormClosedEventArgs e)
{
instance = null;
}
#endregion
}


將建構子改為 private 使外部程式不能直接產生物件,必須透過 GetInstance 方法傳回實體。並且在 FormClosed 事件要將 instance 設為 null,否則當關閉 ChildForm1 後再度按下 button1 會發生"Cannot access a disposed object."的錯誤訊息。

三、模擬MDI模式

另外有一種方式可以達到類似 MDI 模式。在專案中新增加一個 MainForm2,但是不用設定 IsMdiContainer 屬性。
1. 如同 MainForm 拉一個 Panel 並 Dock 為 Top,然後放三個按鈕上去。
2. 拉一個 Panel 到表單上,命名為 ContainerPanel,Dock 屬性設為 Fill,Padding 屬性四個邊皆設定為 4pixel。
3. 拉一個 Panel 到 ContainerPanel 裡面,命名為 FormPanel,Dock 屬性設為 Fill,BorderStyle 屬性為 Fixed3D,BackColor 為 ControlDark。
完成以上步驟,MainForm2 外觀如圖(五)。

Figure5
圖(五) MainForm2 外觀

看起來和 MainForm 是不是很像。接著來看 MainForm2 的程式碼。

private void button1_Click(object sender, EventArgs e)
{
ChildForm1 frm = ChildForm1.GetInstance(); //Singleton方式取得物件實體
OpenForm(frm);
}

private void OpenForm(Form frm)
{
//設定表單屬性
frm.TopLevel = false;
frm.TopMost = false;
frm.FormBorderStyle = FormBorderStyle.None;
frm.WindowState = FormWindowState.Normal;
frm.StartPosition = FormStartPosition.Manual;
frm.Parent = this.FormPanel;
frm.Location = new Point(0, 0);
frm.Size = this.FormPanel.Size;
frm.Dock = DockStyle.Fill;
frm.Visible = true;
frm.BringToFront();
}


button1_click 事件裡面呼叫 ChildForm1.GetInstance() 方法來取得表單實體,然後調用 OpenForm 方法處理顯示表單。重點在於 FormBorderStyle, Parent, Dock 三個屬性的設定,執行起來如圖(六)。

Figure6
圖(六) MainForm2 執行結果

此種方式,在主視窗上面就不會出現 MDI 視窗的最大化最小化的控制項。(完)

Book: Framework Design Guidelines

之前看了一篇MSDN雜誌的關於LINQ發展的文章,文章說明了LINQ語法的緣由,特別是語法背面的物件技術背景。文中提到 "理想語法" 的概念,描述一個理想的資料存取語法,然後說明其中的物件技術背景,再而衍生出lambda 運算式。最後為了讓熟悉SQL語法的開發者能夠銜接,於是逐步發展成理想的LINQ語法。原文連結入下:MSDN Magazine, June 2007: LINQ 的發展及其對 C# 設計的影響

Framework_Design_Guidelines_cover最近在看 "Framework Design Guidelines" 一書,作者是參與開發 .NET Framework 的核心人員,書中說明許多 framework 的開發指引,有許多非常實用的建議。在此書第二章說明了開發 API 重要的原則: 場景驅動設計 (scenario driven design)。以使用者的角度,先編寫一些對主要使用場景來說不可少的程式碼,然後再設計物件模型來支援這些範例程式碼。

這裡所謂 "範例程式碼" 就是 "理想語法"。此書中定義的開發規範涵蓋 .NET Framework 2.0,而Anders Hejlsberg (C#與Delphi之父) 說這些規範還在指導著微軟下一代 API (WinFX (現在正式稱做 .NET Framework 3.0) ) 的開發。前後觀之,在 .NET Framework 3.5 都依循這樣的開發原則進行著。

這本書不論是對發展 API 有所幫助,對於程式開發也可獲得許多有價值的建議,值得推薦給所有的程式開發者。